You are using an out of date browser. It may not display this or other websites correctly.
You should upgrade or use an alternative browser.
You should upgrade or use an alternative browser.
Tilting Quad Velomobile
- Thread starter velocoupe
- Start date
Yes. Storage will be located within the tail section behind the seat-back, and between the two rear wheels. I guestimate the volume to be approx. 130 liters.Are you having any storeage in it?
Cheers
Thanks Emiel.Nice roject. Looks good.
I was just looking at your quad build ideas. Nice stuff.
Thanks Emiel.
I was just looking at your quad build ideas. Nice stuff.
Your build is a lot more complicated. Mine is compared to yours, just a simple build.
True, when you add up the functional features such as Direct Tilt Control + Free to caster + Quad/Delta Switch-Over, my build looks complicated. But, I have constantly striven to keep the design and build of each feature as simple as I could. And, now I'm becoming convinced that the current ride-feel in different riding situations (slopes, bumps etc.) in one way or another validates the embodiment of Caster Steering and Direct Tilt Control.
RIDE-FEEL Side Slopes & Speed Bumps
Locating a suitable slope and bump where I could video the ride action proved to be difficult. So instead, I simulated the ride situations on my driveway.
The side slope scene in the fist video takes place at curb side. Upright parking is maintained on this slope by setting the park-brake, which locks the rear wheels creating a lean-lock effect. The slope from the bottom of the curb to where the right wheels track across the driveway is 14 degrees.
After I release the park-brake, I simply hold the Tilt Control apparatus in a position which keeps the cabin upright (variable lean-lock) and pedal forward. I use thumb steering to traverse the slope and turn down onto the roadway.
Side slope riding is easily accomplished within a range of slopes, speeds, and curves. On gentle slopes such as the crown on roadways, thumb steering is not required. I just hold the tilt mechanisms to keep the velo in an upright posture (more inline with gravity than road camber) and rely on F to C Steering to maintain my straight-ahead direction.
The next side slope video shows the quad heading towards the driveway at an angle to the curb.
A few years back, when I first attempted pedaling up the driveway in my proof-of-concept model, I experienced some alarming moments. Originally, I tried synchronizing the movements of the tilt levers to avoid a quick tilt to the left as the right rear wheel rode up over the curb and the left rear wheel was still at road level. But, whenever my timing was off, the ride felt destabilizing. So I developed a riding technique which continues to be comfortable and consistent.
This technique results in keeping the cabin and frame in a substantially upright posture while riding over the curb at an angle as well as over other bumps or depressions.
The technique is simple and easy to do. I just hold the thumb levers steady and allow the tilt levers to move freely. This strategy lets the rear swingarms move freely up and down without interfering with the upright posture of the cabin and frame. And, I don't have to think about getting the timing right or the nature of the bumps/depressions.
My slogan for this technique became "Steady the Steering-Hang Loose-Enjoy the Ride". It works. The ride feel is similar to my single track bicycle in that an upright posture is maintained when I ride over the curb and up the driveway at various angles.
This technique is also applied in the next two videos simulating travel over a speed bump (a pallet with each end-slat re-positioned to serve as on/off ramps).
In the first instance I just hold both thumb levers steady and the tilt levers loosely.
In the second instance, I avoid a destabilizing tilt to my left by holding the thumb levers steady and allowing the tilt apparatus to move freely (hang loose). The ride feels quite stable because limited lateral forces are felt.
In contrast, a narrow track, non-tilting velo-quad, ridden over a wooden pallet in this manner would likely feel awkward and the lateral forces most certainly felt as first the front wheel and then the rear right wheel travel up and over the pallet.
In the video I purposely run the right wheels close to the edge of the pallet to ensure I have sufficient clearance for the bottom of the tilt lever. On my first attempt at this maneuver, the spur of the high-sided tilt lever scraped and dug into the wood on top of the pallet. Thankfully this is not an issue for everyday riding.
COMPARING the RIDE-FEEL (Cabin on-vs-off)
Without the cabin, the ride is quieter, especially over bumps & depressions. So I will be sticking weather-stripping on the frame of the cabin (where it makes contact with the tail section) to minimize the clanging sound of metal on metal.
Without the cabin, the ride generally feels more free and nimble. But my clear view of the front wheels (with the cabin on) is reassuring and it allows me to perform the same riding maneuvers-even in tight situations.
So while it's a different ride-feel, It's one I'm willing to accept to obtain the advantages of an enclosed vehicle.
During my test rides, I discovered a surprise benefit of riding with the cabin on. It will be the focus of my next post.
RIDE-FEEL Side Slopes & Speed Bumps
Locating a suitable slope and bump where I could video the ride action proved to be difficult. So instead, I simulated the ride situations on my driveway.
The side slope scene in the fist video takes place at curb side. Upright parking is maintained on this slope by setting the park-brake, which locks the rear wheels creating a lean-lock effect. The slope from the bottom of the curb to where the right wheels track across the driveway is 14 degrees.
After I release the park-brake, I simply hold the Tilt Control apparatus in a position which keeps the cabin upright (variable lean-lock) and pedal forward. I use thumb steering to traverse the slope and turn down onto the roadway.
The next side slope video shows the quad heading towards the driveway at an angle to the curb.
This technique results in keeping the cabin and frame in a substantially upright posture while riding over the curb at an angle as well as over other bumps or depressions.
The technique is simple and easy to do. I just hold the thumb levers steady and allow the tilt levers to move freely. This strategy lets the rear swingarms move freely up and down without interfering with the upright posture of the cabin and frame. And, I don't have to think about getting the timing right or the nature of the bumps/depressions.
My slogan for this technique became "Steady the Steering-Hang Loose-Enjoy the Ride". It works. The ride feel is similar to my single track bicycle in that an upright posture is maintained when I ride over the curb and up the driveway at various angles.
This technique is also applied in the next two videos simulating travel over a speed bump (a pallet with each end-slat re-positioned to serve as on/off ramps).
In the first instance I just hold both thumb levers steady and the tilt levers loosely.
In the second instance, I avoid a destabilizing tilt to my left by holding the thumb levers steady and allowing the tilt apparatus to move freely (hang loose). The ride feels quite stable because limited lateral forces are felt.
In the video I purposely run the right wheels close to the edge of the pallet to ensure I have sufficient clearance for the bottom of the tilt lever. On my first attempt at this maneuver, the spur of the high-sided tilt lever scraped and dug into the wood on top of the pallet. Thankfully this is not an issue for everyday riding.
COMPARING the RIDE-FEEL (Cabin on-vs-off)
Without the cabin, the ride is quieter, especially over bumps & depressions. So I will be sticking weather-stripping on the frame of the cabin (where it makes contact with the tail section) to minimize the clanging sound of metal on metal.
Without the cabin, the ride generally feels more free and nimble. But my clear view of the front wheels (with the cabin on) is reassuring and it allows me to perform the same riding maneuvers-even in tight situations.
So while it's a different ride-feel, It's one I'm willing to accept to obtain the advantages of an enclosed vehicle.
During my test rides, I discovered a surprise benefit of riding with the cabin on. It will be the focus of my next post.
A SURPRISE BENEFIT With The Cabin On
The pivoting seat bottom serves as the primary tilt controller while the tilt levers provide additional force or counter-force to the tilting action. Occasionally I release my hands from both tilt levers and just actuate the seat bottom to control tilt and steering. Problem is, this hands-free riding is not a fail-safe technique because I have to grab at least one of the tilt levers to apply a counter-force whenever I unexpectedly tilt the velo too far.
However, with the cabin on, I can stick my arms out of the side windows and stabilize my upper body on the seat, and then use the pivoting seat bottom as the sole tilt controller as shown in the video below.
In itself, this technique is not a worthwhile riding method. But, it does show that F to C steering operates "hands-free" which offers me some riding options.
When I grab two inside points of the shell or frame, I can stabilize my upper body even more than sticking my arms out of the windows. This added stability provides enough tilt and steer control (seat bottom as the sole tilt controller) to enjoy hands-free steering in ideal riding situations.
I think this discovery is worthy of pursuit, as I find that different hand positions can contribute to a more relaxing ride, especially on longer runs.
In my next video, I will try to capture the ride action at higher speeds along straight sections and 90* corners.
RIDE FEEL Straight Ahead + 90* Corner
The velo's ride-feel is a little like riding a bicycle, yet, somewhat different. The difference is more noticeable along straight sections. I think it's because, instead of counter steering, I tilt the vehicle to stay the course, which makes it feel more like some kind of auto-steer micro car than a bicycle.
The slight tilting motions are visible in the video below, but are barely discernible to the rider. So, it's a different but comfortable ride-feel.
Yet, when cornering, I push/pull the tilt levers, which makes it feel like I,m steering around the corner. But in reality, I'm controlling the tilt to guide the steer angle. So, even though counter steering is not used, the ride-feel is more like my upright bicycle.
Actually, it feels better than cornering on my bicycle. With the quad's two sets of laterally separated wheels and the mechanical tilt apparatus, I get the sense that I can't tip over. There is a remarkably stable feeling when tilting in corners which translates into a lot of fun.
In the video, my speed in the 7 meter radius corner is only 16 km/hr. In my quest to simplify the drive train, I am currently running with a 34 "gear inch" mono-speed arrangement which is the first step in my plan to install a 9 speed Pinion gearbox.
Looking back at the video, I can tell the quad is dog-trotting a bit and the rear wheels are displaying a positive instead of neutral camber. These ride-feel videos are helpful in exposing alignment and other issues. I have already made various alterations and adjustments after reviewing previous videos.
TILTING! Part of the Learning Curve?
A few days ago my "camera operator" mentioned that she wanted to try riding the quad.
After I adjusted the seat position, she commented that I should think about redesigning things to make the adjustment process easier.
I tried to make the pre-ride instructions easy to follow and to reflect my approach to riding it. " It's all about tilting," I said. "At first , get a feel for the tilt apparatus. Use the tilting seat-bottom mostly, and use the tilt levers to correct any over-tilting. Just control tilt and let the Caster-Steering do its thing". I detected a little "glaze-over" in her eyes.
Although she appeared to push/pull on the tilt levers more than weight-shift on the seat-bottom the quad performed more or less as expected, but her response was not what I expected.
She remarked that she could "feel" the tilting action a lot more than she expected, and that it would probably take her a long time to get use to it. Her final words were, " Why can't you just make it steer without tilting?"
The question caught me totally off guard. My initial thought was - Good Grief - now I understand why non-tilters are so widely preferred. But I quickly remembered my pre-ride instructions.
The instructions should have mentioned that to reduce the "feel" of the lateral tipping forces, she can hold the vehicle in an upright posture and use thumb-steering until she's up to a speed when the lateral forces are minimal. "Good idea," she said.
She admitted that her next ride felt better.
But then she declared, "It's too hard to press the thumb-levers, my thumbs are already sore, why can't you make them easier to operate?"
THAT was her LAST ride.
So I learned a few things. Videoing and test-riding a prototype are very different undertakings. Next time I'll make sure the novice rider doesn't require a seat adjustment. My pre-ride instructions need to be revised. And I will try to rethink the thumb-steering design at least one more time.
In hindsight, the learning curve applied to both of us.
Thanks for posting your build here!
Great work, and a fun thread to follow.
Cheers,
Brad
Great work, and a fun thread to follow.
Cheers,
Brad
Hi Brad.Thanks for posting your build here!
Great work, and a fun thread to follow.
Cheers,
Brad
AZ is an ideal DIYer's posting site.
So, my thanks to you and all the members who have been so supportive.
Cheers
Congratulations on the fantastic construction!
I think it's one of the most beautiful projects I've ever seen.
I think it's one of the most beautiful projects I've ever seen.
Hi jacklanterna.Congratulations on the fantastic construction!
I think it's one of the most beautiful projects I've ever seen.
Thank you for the kind words.
Cheers
Hi hape03,Impressive!
Thanks for the link.
Your multi builds are also impressive. Nice job on the videos. Lots of good fun!
Your cargo trailers made me think of Emiel's caravan and quad project. Am I correct that a caravan is not yet in your inventory?
Cheers
If your winter season is somewhat similar to my neck of the woods, I suspect those plans may remain in the drawer for some time yet. For me, this is a slow time of the year for project work (no heat in the garage). So I've kept indoors and had the time to revisit some of my posts, and it occurred to me that, I didn't really explain why I incorporated features such as hub-centered wheels with special front hubs. Or, why I chose to use swingarms instead of front wish bones.
So, I decided to try my hand at Google Slides to graphically illustrate some of those design decisions. I then video taped the slide show. It's all a bit sticky (slide changes) with occasional audio-hicks, but overall I think it illustrates those design decisions. Here it is.
When I started posting here, I displayed a high level of incompetence at inserting photos and videos. That was a little over a year ago. Admittedly, my skill level was barely novice, as I retired before computers came into my workplace. Even my multi attempts to register as an AZ member were totally unsuccessful. Thankfully, Brad kindly registered me via some wizard-like abilities. And then, thanks to Paul, I managed to get the hang of inserting photos and videos.
And now, somehow I've come up with this slide show (sticky slides and all). Is this evidence of some kind of "personal techno-growth-spurt" at my age? Makes me shiver.
If your winter season is somewhat similar to my neck of the woods, I suspect those plans may remain in the drawer for some time yet. For me, this is a slow time of the year for project work (no heat in the garage). So I've kept indoors and had the time to revisit some of my posts, and it occurred to me that, I didn't really explain why I incorporated features such as hub-centered wheels with special front hubs. Or, why I chose to use swingarms instead of front wish bones.
So, I decided to try my hand at Google Slides to graphically illustrate some of those design decisions.Here it is.
After being told about it, I downloaded a "screen recorder" and did a "take 2" on the slide show. The message is the same, but the sticky slides are gone and background music is added. Here it is again.
WOWSER, Howser. That, sir, is impressive design & engineering. Those wheels are exciting. I'm beginning the 1st round design & build of what I hope is 1st of a few (or more) streamliners.Since becoming an AZ member I have become familiar with some of the builds in "Discuss Your Project". I must say, this site is a real gem for a DIYer. I am impressed by the know-how, knowledge and the support expressed by members of this community, as well as DannyC's humour.
This project is now in its 14th year of numerous failures, many so-so results, and a few successes. Over the years I experimented with all sorts of tilting, steering, and wheel designs. Even the vehicle's layout has morphed from a tadpole into a quad, and now into this delta-quad switch-over model which my wife claims is evidence that I will never truly complete the project.
I'll begin by describing the design, build, and assembly of the two-part main frame and six swingarms. The following images show two full-size dimensional drawings and how the notched, bent, then welded, aluminum tubes match a drawing. A left or right swingarm is made by simply flipping the fabricated part over, as every part is built on one plane without the need for welding jigs. I required four dimensional drawings - two for the main frame, one for the front 4 swingarms and one for the 2 rear swingarms.
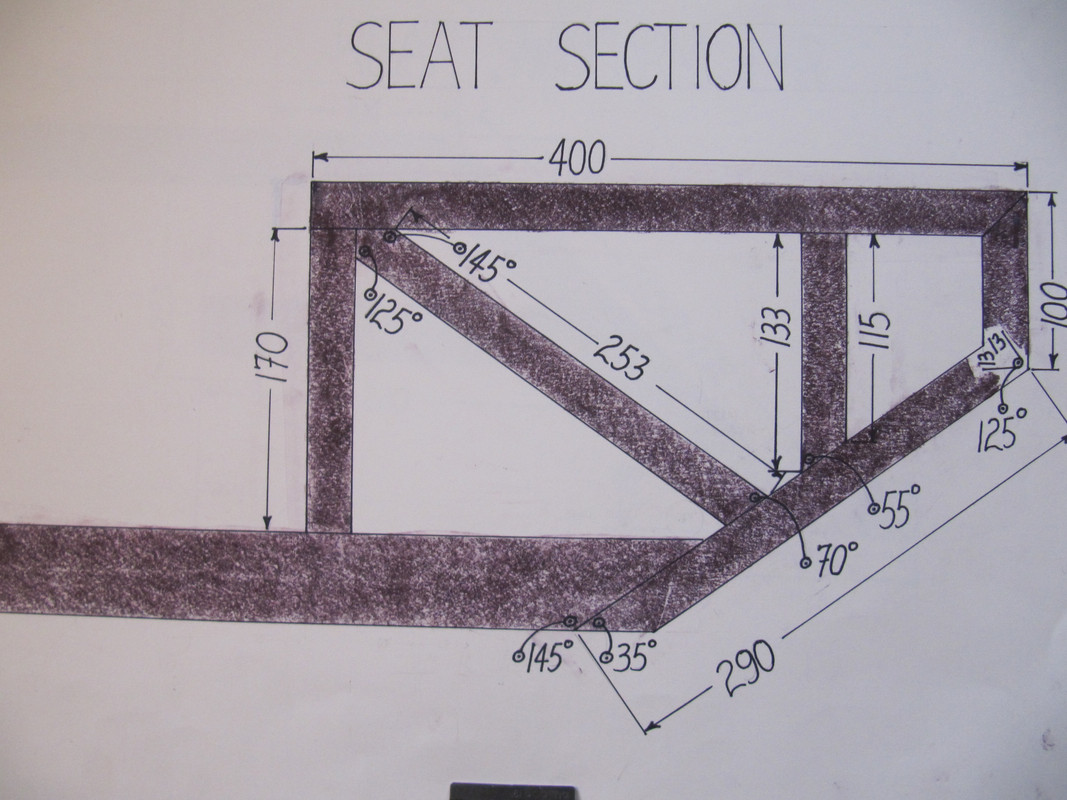
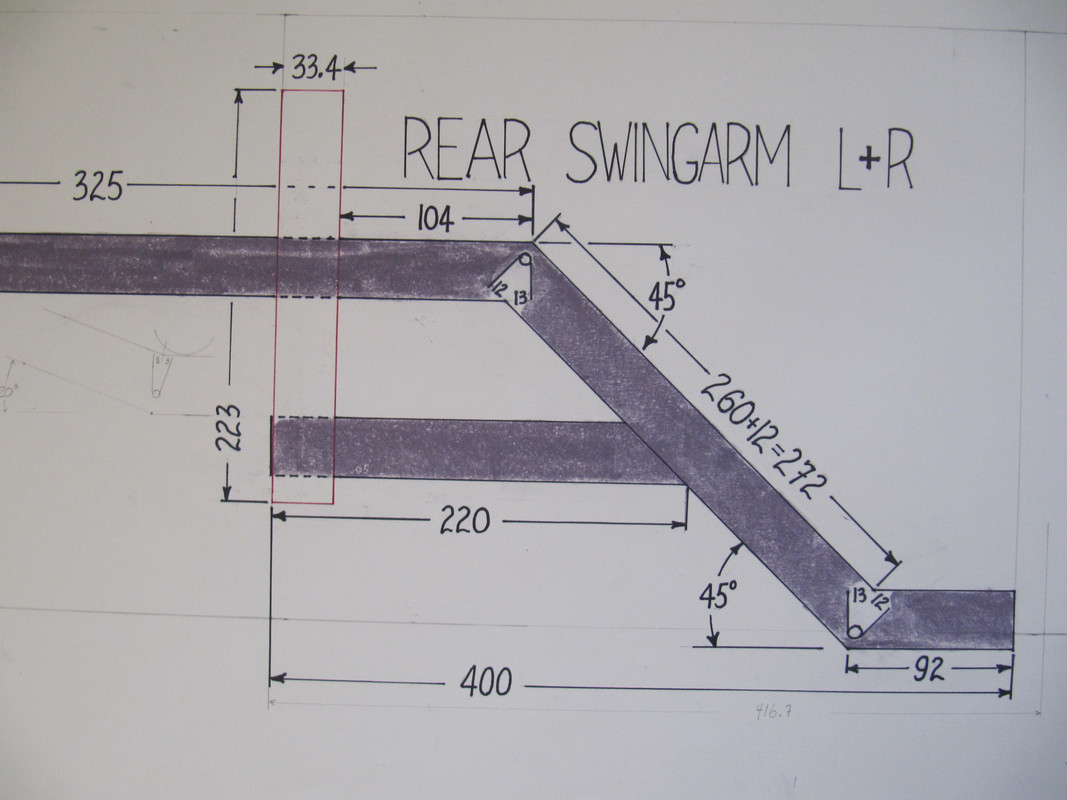
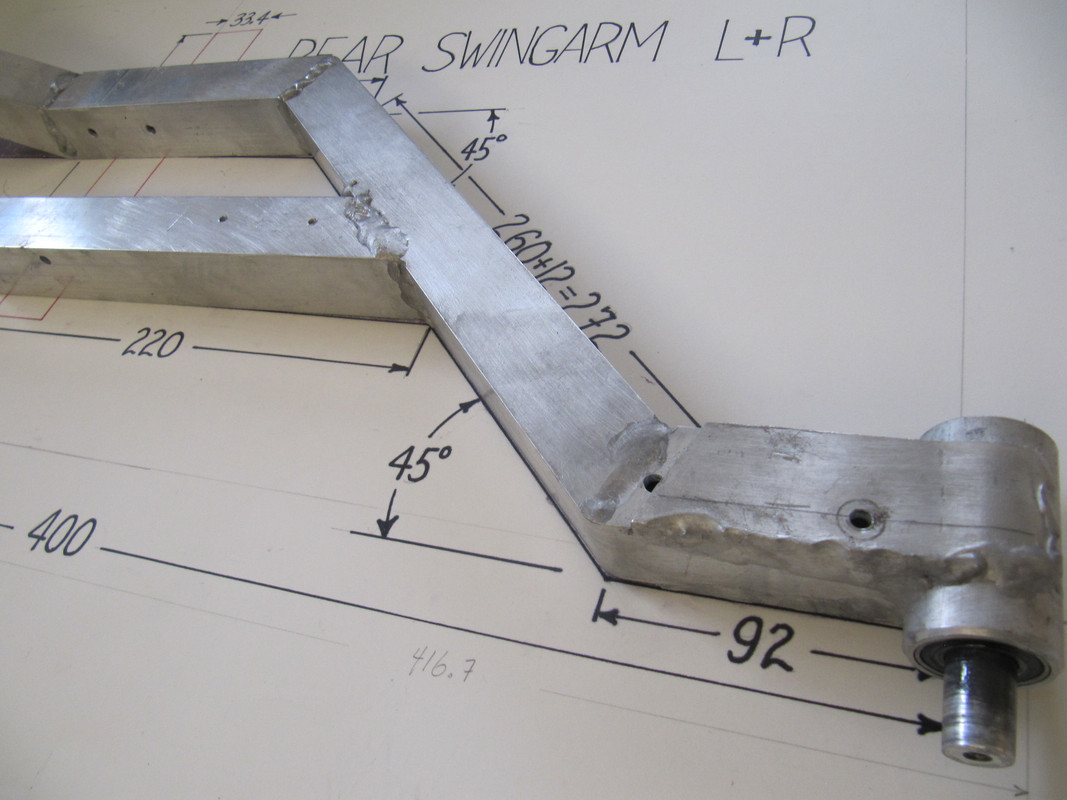
Three spindles are fastened to the main frame with brackets and hose clamps. Yes, standard hose clamps). They worked surprisingly well for fastening round-tubed items onto my previous models while offering the flexibility of quick removal for the all-too-frequent redesign/rebuild sequence. For high stress locations I used T-Bolt clamps which are similar to fuel-injection hose clamps, but larger.
2-part Main Frame with Spindles
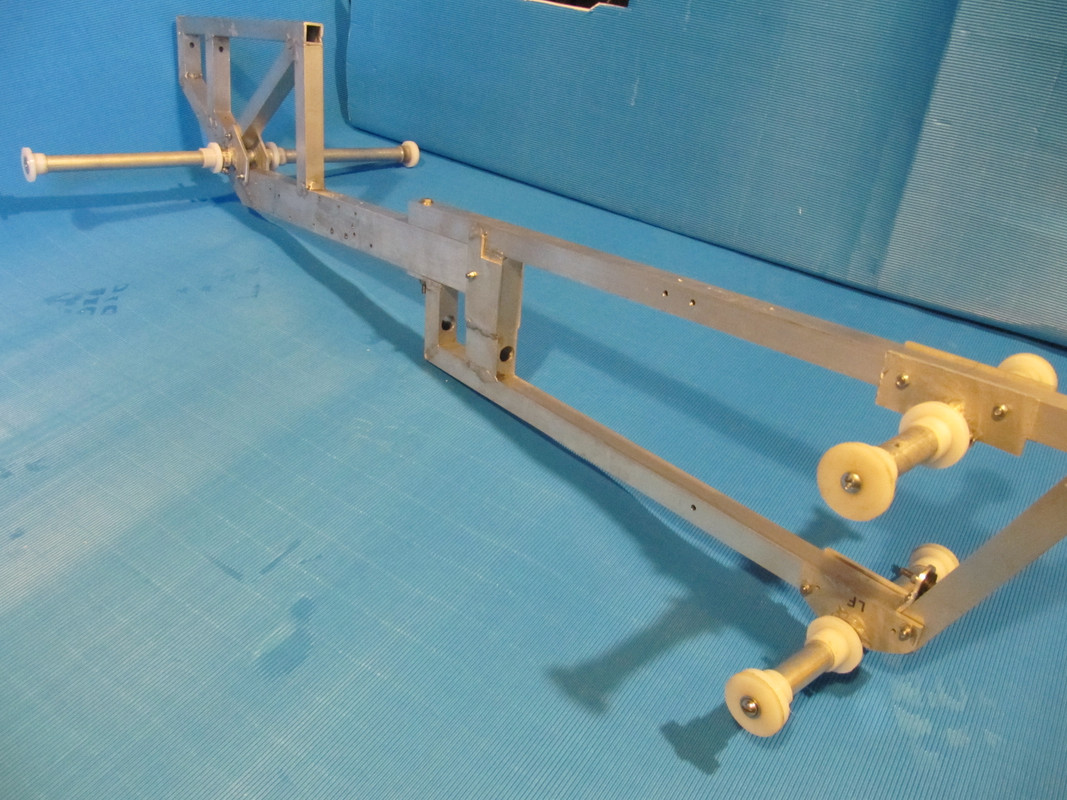
The spindles are shown with machined nylon bushings, but during actual assembly, the bushings are inserted into the swingarms and then pushed onto the spindles. Bolts with nylon washers are fastened into the spindle ends to hold the swingarms in place. Blue cardboard hides the distracting un-insulated wall of my garage and helps to make the aluminum tubing more visible than if it were just against the concrete flooring.
4 Front Swingarms
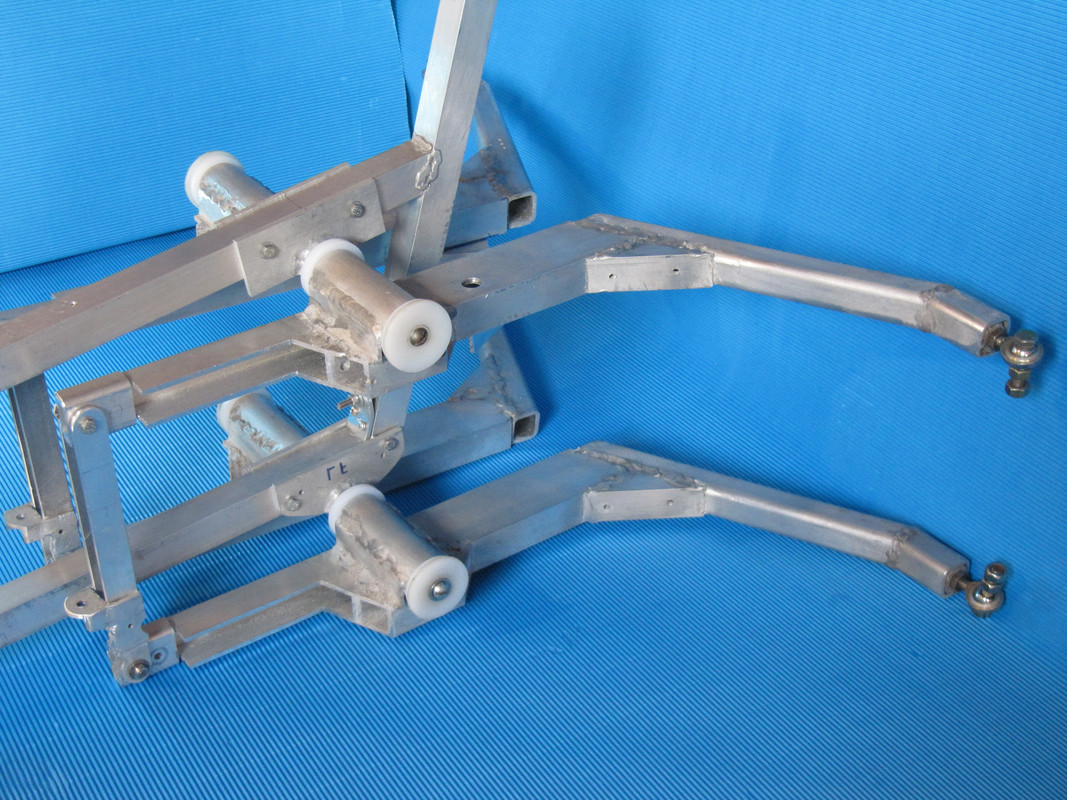
The front swingarms are likely overbuild and somewhat grotesque looking. I experimented with dual wishbones and found that swingarms perform better due to their "plane of inclination" suspension travel which minimizes tire-scrub in depressions, bumps, and when tilting in corners. Plus, the switch-over to a delta is quick since a single-sided swingarm is simply placed onto the upper front spindle.
I considered using smaller diameter tubes similar to the structure of the dual wishbones on the Tripendo Trike. While fabricating would have been more complicated and likely require welding jigs, the result would have been more visually appealing as well as lighter in weight.
As things are seldom ideal every step of the way, I eventually settled on what you see. Thankfully, the more ugly central section of the swingarms (next to the frame) will be hidden by the velo's cabin section.
Rear Swingarms
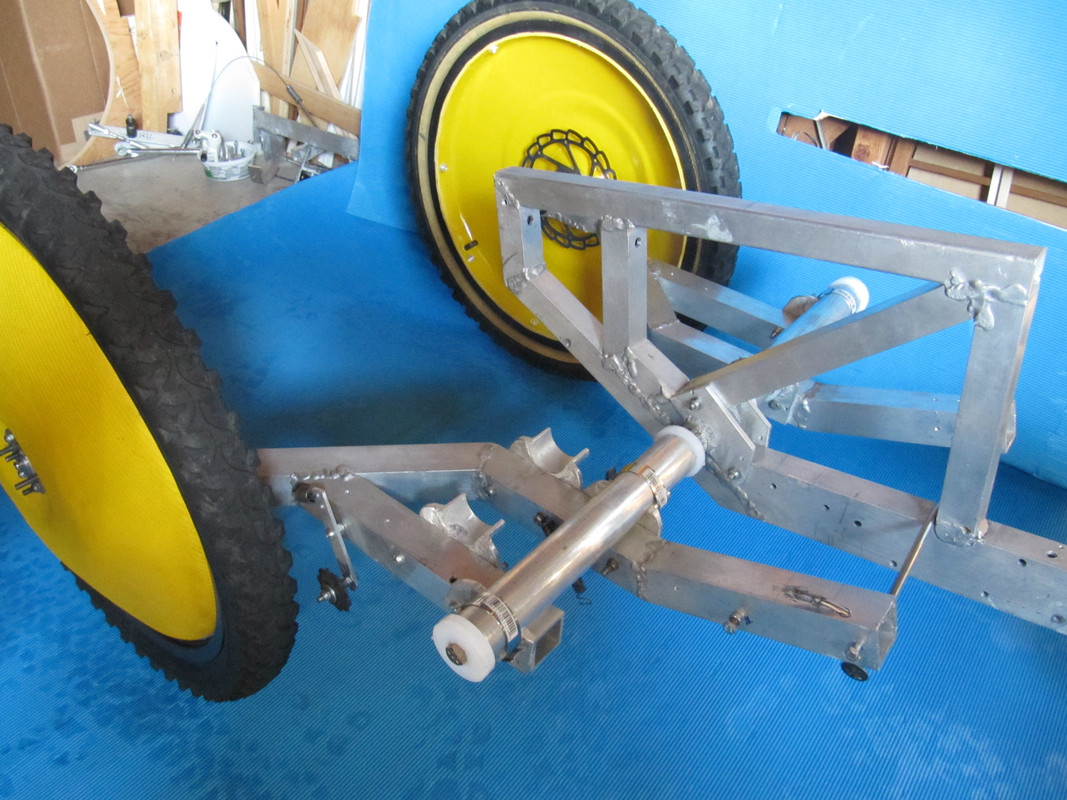
The rear swingarms are more complex and heavier than those generally found on free-tilters. I'm not sure if these are overbuilt, but they will need to take the stresses generated by the tilting apparatus.
4 Wheels Nesting
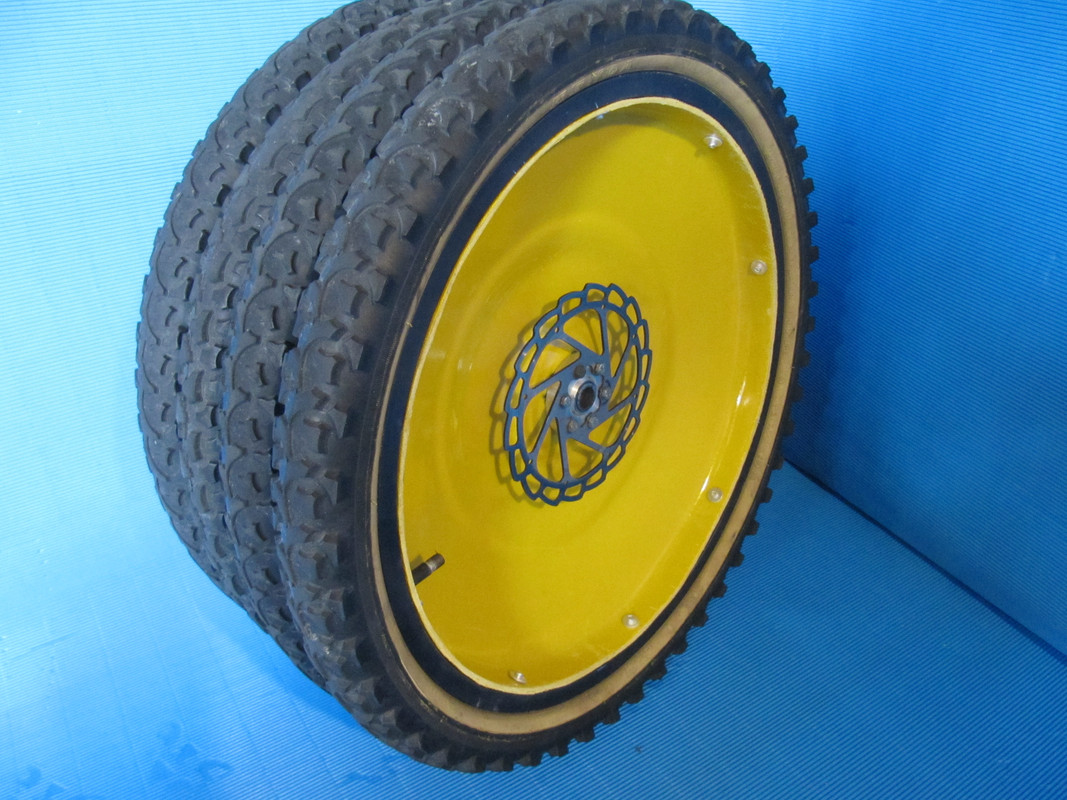
Four shallow-dished fiberglass wheels with flange and brake routers attached are shown here before being installed onto the swingarms.
The vehicle (weighing 9.7 kg) is now ready to roll.
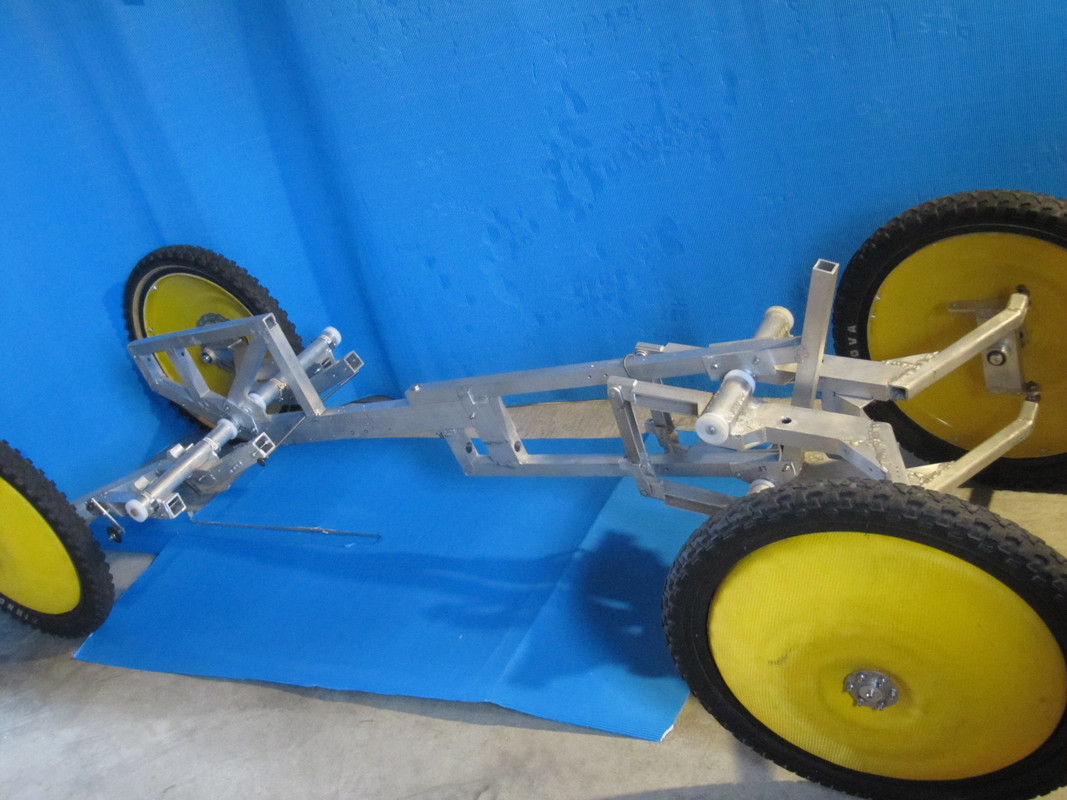
In the next post I will focus on the tilting mechanisms and suspension.
Like Reply
Report
Hi Ronald
Thanks for the encouraging responses. About the wheels! I'm pleased that their structural integrity has so far proven to be sufficient, but as a home builder, the wheels have also proven to be difficult to build perfectly centered and true. Since the wheels are important to the performance of the velos steering and tilting, I occasionally dream about being able to just purchase professionally built hub-centered wheels, because, from my experience, the rest of the velos components are easy enough to make.
When you say "streamliner", are you thinking of a bike or trike configuration?
Cheers
